Monday, November 22, 2010

Last Minute Turkey Day Craft

Hello, friends! I'm busy putting the finishing touches on my preparations for the big feast tomorrow, and I just wanted to share this fun little craft with you. I'm a total sucker for goofy holiday napkin folds, so my daughter and I made these little guys last year...


We made them at the last minute last year and I think they turned out pretty cute. Just get a pinecone (I couldn't find any nice short fat ones in my yard, so I cut some long narrow ones in half), wrap a pipecleaner around the middle and fold the ends into feet, then glue on a beak and waddle cut out of felt or fabric scraps or construction paper, and googly eyes (I didn't have any googlies on hand so I cut those out of felt too). Then fan fold a napkin behind the pincone for the tail and you've got a cute, festive, kid-friendly addition to your table!

***Oops! I just realized I left out an important part of the instructions- for the face, before gluing on the beak etc., pull off one of the scales, flip it over and glue it onto the front of the pinecone as the face. Then glue on the eyes, beak etc...

Happy Thanksgiving!

Love,

Wednesday, October 13, 2010

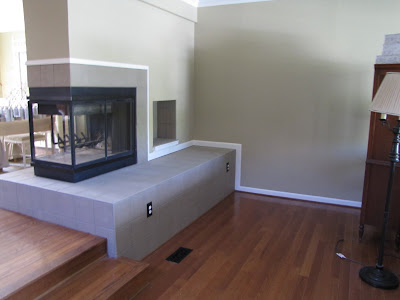
My Dad Rocks! (aka 3-sided mantel)

Remember when I went from this:


to this? (Check it out here)

Ever since then I've wanted to have a mantle wrapping all the way around so that I would have one rectangular space above the mantle instead of that difficult upside down L shape wall space to fill.

Enter Dad.


First he removed the trim from the top side of the fireplace surround. Then he screwed strips of wood into the wall just above the tile to support everything. Then he added the little silver brackets to support the mantel shelf. Next the shelf boards were added on top- they are screwed into the wooden strips and the brackets. He even inserted little wooden pegs where the shelf boards meet at the corners to make sure they would stay even. Then he trimmed the face of the shelf boards in a narrow decorative molding.


Then it was time to add the decorative moldings. First he attached baseboard molding upside-down to the underside of the mantle shelf in order to give the crown molding something to attach to. The baseboard molding is screwed in from the top of the mantel shelf.


Next he trimmed it all out in crown molding.
Some action shots:


Can't you just hear him grunting?!

Wanna know something really funny? Whenever my dad works on a project he makes up his own expletives. When I was a kid I thought he was cursing in Italian because he's Italian and that's kinda what it sounds like. But, nope. Turns out it's just his own language. Now everyone in my family jokes that Dad speaks Swahili when he's working.


After spackle, caulk, sanding and two coats of paint, it now looks like this!


and it is super sturdy! I could seriously do chin-ups on it! Okay, someone who can do a chin-up could do chin-ups on it!

Now I just have to figure out what in the world to put up there! (Pay no attention to the vase of pinecones and candlesticks on the dining room side- I was just experimenting...)


Thanks so much, Dad! I absolutely love it! You rock!!

BTW- this dining room side is going to be a little difficult to accessorize because of the indentation above the fireplace. I prefer symmetry, but I may be forced into another arrangement on this side because of the indentation. I may start by trying to force some symmetry by leaning something (wreath, mirror...) against the center line, hopefully masking the indentation, but I'm not sure that will work. Oh, and I'll have to remove my script "F" in order to do that, but I believe it is repositionable and I can think of lots of other places in my house to use it, maybe over the mantel on the living room side in the center. What do you think? Suggestions?


Love,

Friday, September 17, 2010

Our Faux Wood Floor

Over labor day weekend my hubby and I decided it was finally time to replace this gross pink carpet in his man cave.


The large wooden piece just inside the door is his desk, (aka the world of warcraft lair) and since the room occasionally doubles as a guestroom when his parents come to visit there is a daybed with a pop-up trundle against the far wall. Can you believe that when we moved in this room also included coral walls and a wall of mirror? Ugh. Trust me, as humble as it looks now, it was much worse before.

The other door on the right opens to our storage room.


Aside from the fact that the pink color wasn't exactly working in the man cave, our former pet cat decided to favor a spot behind the door in this room when she decided to refuse her litter box. Disgusting. Yeah, I'm not real choked up about the loss of this particular pet!

If any of you have ever dealt with this lovely problem before, you know that the smell of cat pee permeates everything and is impossible to wash out of carpet, especially once it gets into the padding and the sub floor like it did here. Can you tell I'm in no hurry to get another pet?! Maybe it's my super sensitive prego sniffer, but to me there's no worse smell in the universe. Cat pee is my kryptonite!

Since there is pergo flooring throughout the rest of the basement, we decided to do a faux wood peel and stick plank floor (Thanks to Pink and Polka Dot for giving me this idea- make sure and check out her faux wood floor!), and I have to say the whole process was pretty easy (no saws required since you can cut it with a pair of scissors!) and very inexpensive- just 98 cents/square foot!

First we cleared the room...


Then we ripped up the carpet (which was actually really easy).

Then came the hardest part of the job, pulling up the tacking strips around the perimeter of the room (sorry- no photo of this step!) My hubby popped them off with the back side of a hammer.

Next we cleaned the floor to get rid of all the dust and debris.

Then, to really get rid of the smell we painted the cement floor beneath with Kilz. This also gave a good surface for the flooring to adhere to.

The next day we got started laying the new floor. We started in the center of the room so that if the room is not exactly plumb, the floor wouldn't be obviously slanted on one end- make sense? Once we made sure we had a straight line marked across the center of the room, we started peeling and sticking!


It took about 3-4 hours to do the whole room, but it was really easy. I loved that it was so easy to cut the "planks" with a scissor to get a good fit around corners. Before we knew it the room looked like this!

The last step was to use either a 100 lb. roller (which I think you can rent from your local home improvement store) or a strong hubby and a rolling pin (we went with option B!) and roll the whole floor to make sure the adhesive makes good contact with the floor beneath.


I couldn't be happier with it the results!


A big thank you to Pink and Polka Dot for giving me this idea!

Now if only I can get my hubby to let me decorate in here...


Love,

Tuesday, September 14, 2010

Completed (mostly) Dining Room Reveal and a little anouncement!

Okay, do you really want to hear me apologize again for leaving you hanging for so long between posts? Well, I have a really good excuse this time. I've been sick. And tired. And I couldn't be happier about it. There's a bun in the oven, y'all! And I dont' mean this kind:


I'm expecting baby Fitz #3 around March 11, 2011! I'm now officially in my second trimester and finally feeling better. I've gotten a few projects completed over the last week or so that I'm excited to show you. I'll show you my dining room today and the other things throughout the week.

To all my blogging buddies- sorry I haven't been visiting. I haven't been doing much of anything other than squeezing in naps whenever possible and popping antacids! Anyone else have crazy heartburn during their first trimester?? I still have some heartburn, but the morning noon and night sickness has drastically subsided. Thank GOD!!

To refresh your memories here's my dining room before shot:


First off, thank goodness for Gorilla Glue! You've seen two of these chinese chippendale side chairs in my dining room before shots, but I actually owned four side chairs, two of which were sitting in my storage room because I thought they were beyond repair. Thanks to Gorilla Glue Clear, and some strategically placed rubber bands, I now have 4 sturdy side chairs (plus the two arm chairs that reside in my living room). I gave them a fresh coat of spray paint (my first time using Heirloom White and of course, I love it!) and reupholstered the seats and they have a new lease on life!


Here's a closeup of the fabric, purchased from fabricguru.com:


Here's another quick and easy makeover- I relined the back of my china cabinet with grasscloth I purchased at Jenny's sale and added some pretty velvet ribbon to add a little more interest.


Adding the ribbon with my trusty hot-glue gun only took a few minutes and I am so in love with the effect of this little detail...


By the way, this whole makeover was planned around my china pattern, "Lichfield" by Royal Doulton. Planning around the colors in my china was a bit limiting, but I love the result. If there are any brides-to-be reading, if you're choosing a china pattern and are considering a colorful pattern, make sure you really love it because you'll be decorating your dining room around it for the rest of your life! Simpler patterns are much easier to decorate around!


These little sconce/ledges were a goodwill find with the homegoods stickers still on the back! I originally wanted some beautiful framed chinese paintings on silk, but the right pair eluded me several times on ebay, and I didn't want to have this room on hold any longer! Then when I found these ledges I wanted the perfect pair of either ginger jars or blanc de chine jars or vases, but that also seems to be a tall order (for what I'm willing to pay!) so at least for now, I'm using what I have!!

The ledge actually doesn't have a groove for a plate, so I added two raised lines of hot glue and let it dry to make a little groove for a plate. It worked great.


Isn't this mirror gorg? It makes me swoon.

Don't be jealous, but I got it for free at my absolute favorite place for home decor shopping- my mom's basement. Score! Thanks so much, Mom! I Love it!

Here's what I came up with for the dining room side of the infamous 3-sided fireplace:


There may be a mantle in the not-too-distant future for this fireplace, so I didn't agonize too much over what to put here, but here it is for now. Excuse the weird reflection on the far left wall!

I got the large script "F" from Back40Life with my gift certificate when I won the $5 challenge. I had another spot in mind for it, but it didn't quite work there and I love it here. I also ordered something for my daughters' room which I'll show you in the next few days...

On the left side are 12 beautiful mirrored frames I found for $4 each at- get this- Sears Outlet. If you have one near by it's worth a stop. They don't just have fantastic deals on appliances (I also bought a new oven there a few weeks ago when our old one blew up- long story) my store now also carries their Lands End items- including home items- for 80% off retail!


I filled them with vintage botanical prints that I printed out for free from the NYC Public Library website.

Now there's one thing I'd love you all to weigh in on. Now that I have 4 of the slipcovered parson chairs and 4 fully functional chinese chippendale side chairs, I can't decide whether to leave the parsons chairs as the side chairs with the CC chairs as the host chairs or vice versa. Whichever chairs act as the host chairs, their mates will sit aside the china cabinet...

Do you like it better like this:


Or like this:

Hmmm, I think if I leave it like this I should monogram the host chairs...


What say you??

Here are some links to the other projects in this room:
Easy Pinch Pleated Drapes
Henriksdal Dining Chair Slipcovers
DIY Faux Wainscoting and Paint

Love,

Friday, August 6, 2010

Floral Slipped Chair

I'm participating in the Slipcover Party at Pink and Polka Dot! (Pink- for some reason I couldn't grab your button!)

My BFF since 7th grade recently moved into a gorgeous new house. This chair used to be in her basement media/family room, but in the new house she wanted to use it in the main upstairs living room.


The punchy print worked great in her old house, but she was going for a different look in the new living room so I offered to slipcover it for her. I just finished...
Instructions on making slipcovers can be found here.


I found the fabric on sale at my local Joann's a few months ago for $3/yard! I needed almost exactly 6 yds to finish the job. There was no info printed in the selvage of the fabric- does anyone recognize the pattern?

Pardon the multitude of projects going on in the background!


Love,

Monday, July 19, 2010

Paint and Faux Wainscoting

I finally finished painting (and re-painting!) and putting up the faux wainscoting a la Thrifty Decor Chick!

Here's the before:

not a terrible wall color, but I was wanting something lighter and brighter. So, I picked a really pale green, primed and painted two coats and got this:


and I hated it. Ugh. I was really not looking forward to trekking back to Lowe's, picking another color, spending more money on another can of paint, spending another day painting and hoping for the best. Then it occcured to me- I had half a can of green paint that was too dark, and half a can of green paint that was too light. I couldn't use either one so I had nothing to lose. I poured the contents of one can into the other and mixed thoroughly and got this:


and I love it! The color doesn't look quite the same on my monitor as it does in real life, probably because of the flash. I'll try to get better photos when the light improves. For now you'll just have to take my word for it- it's the perfect medium-light gray-green. I actually compared the color to some paint swatches and the resulting color bears a striking resemblance to "Garden Shed" from Martha Stewart's paint line.

Also- if you look behind the chinese chippendale chair (which is due for reupholstering) you can see my faux wainscoting! I'm really excited to tell you about this because I found I a great short cut! I was all set to use Thrifty Decor Chick's instructions. I went to Lowe's and marched myself down the molding aisle, giving myself a pep talk about saws and mitre boxes when I spotted this:


premade molding squares! They're made of lightweight poly so all I had to do was glue them to the wall with all purpose liquid nails, caulk any gaps and paint! They come in different sizes so you can choose the one that works best for your walls. The 18 x 23 size worked great for me. I believe that was the largest size and they were about $12 per panel (the smaller sizes were a few dollars less). I spent just over $100 to do the whole room. I bet buying the molding and doing all the cutting myself would have saved me money, but I am so freaked out about saws, that it was worth it to me to buy these ready made.

I'm pretty happy with the finished product:


BTW- what do you think of my new (to me) rug via CL? It's a 6x9 Restoration hardware basketweave seagrass rug. It still sells for $249 but I got it for $50!

Next up in here:
  • reupholster Chinese Chippendale chairs
  • Change the backing in the China Cabinet
  • Art and accesories!
Love,

Friday, July 2, 2010

Easy Pinch-Pleat Drapes


Voila!


When I started thinking about refreshing my dining room I knew I wanted pinch pleated drapes. After reading this post at LGN I was pretty convinced that using pleating tape and pleater hooks was the way to go, but when I decide I want to do something I'm waaaay to impatient(and cheap!) to order something online (and pay shipping for it!). Lucky for me, my local Joann's fabric sells the pleater hooks and a very similar pleating tape by the yard!

The hooks look like this:


and the tape looks like this:

Those white vertical lines that look like stripes are actually little pockets woven into the fabric. You make a simple rectangular panel and then sew this tape to the top edge. Then you insert the four prongs of the hooks into every other stripe-pocket (leaving several inches between each hook) to form the pinch pleats. So easy! And goof-proof!

I'm really pleased with how they turned out and I love this fabric!


(excuse the mess on the sideboard! )


I also got all the trim and the walls below the chair-rail painted! Next up (if I can get over my fear of saws!) Faux wainscoting ala Thrifty Decor Chick!

Love,


Related Posts with Thumbnails

Followers