I'm participating in:
and
Top Projects 2010 at Southern Hospitality
Here are my favorite projects of 2010! I'm so glad these parties gave me a little nudge to reflect back on what I've been able to accomplish in my home this year, especially since I was feeling badly about not posting as often as some bloggers do. I've realized that what I lack in frequency, I think I make up for in content! Without further ado, here are my faves from the last year...
I made this slipcover:
I slipped this coffee table:
I made new pillows and finally wrote out a tutorial for slipcovering sofas and chairs (which may have taken longer than actually sewing the slipcover!)
I used a ledge shelf to make a simple wall mounted charging station:
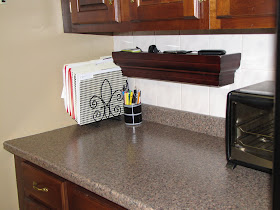
I turned this clementine crate...
into this little footstool:
I revamped my sewing/craft area from this (eek):
to this!
and took my daughters' bathroom from this:
to this:
I copied these Ballard pillows:
and came up with these:
I made this prayer wall art for my daughters' room for less than $5!
I slipcovered this chair for my dear friend. Before:
After:
I wasn't thrilled with the state of my dining room (before):
but after making more slipcovers, refinishing and reupholstering the side chairs, sewing new drapes, doing lots of painting and faux wainscoting, backing the china cabinet with grasscloth and velvet ribbon and adding some new accessories, I'm in love!
I couldn't take one more day of pink carpet in the "man cave"...
so my hubby helped me lay a great looking and downright cheap (and easy!) peel and stick faux wood floor:
I took my 3-sided fireplace from this pink monstrosity:
to this with the help of spray paint (lots and lots of textured spray paint!)
and then my wonderful dad helped me take it a step further and added this beautiful mantel!
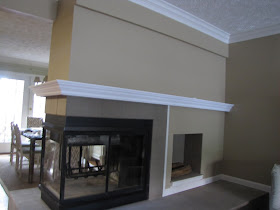
He also built this nice chunky mantel in our basement family room (lots of details on this room including some not-yet-finished projects in the new year!)
and last, but not least, I had a ball decking my halls for Christmas!
I hope you enjoyed my 2010 year in review and I hope you'll come visit me soon!
Love,
Tuesday, December 28, 2010
Egg Nog French Toast
In case anyone else out there is wondering what to do with all that leftover egg nog...
Egg Nog French Toast
This recipe worked great for Christmas morning with little ones- it went together really quickly after they were in bed on Christmas Eve and in the morning I just pulled the pan out of the fridge and set the oven to preheat on our way down to see what Santa brought. Then I popped it in the oven when we came back up to look in the stockings. 15 minutes later it was ready to eat and I didn't have to spend any time in the kitchen! I have a hunch that adding a couple of minutes to the bake time would make it unnecessary to set the pan on the counter for 30 minutes, but I haven't tried out this theory yet...
Merry 4th day of Christmas!
Love,
Egg Nog French Toast
- Leftover French Bread (roughly 12 slices, or as many slices as you can cram into a 9 x 13 baking pan without overlapping. They can be fresh or stale.)
- 1 1/2 cups egg nog
- 2 eggs, scrambled
- 1 tsp cinnamon
- a dash nutmeg
This recipe worked great for Christmas morning with little ones- it went together really quickly after they were in bed on Christmas Eve and in the morning I just pulled the pan out of the fridge and set the oven to preheat on our way down to see what Santa brought. Then I popped it in the oven when we came back up to look in the stockings. 15 minutes later it was ready to eat and I didn't have to spend any time in the kitchen! I have a hunch that adding a couple of minutes to the bake time would make it unnecessary to set the pan on the counter for 30 minutes, but I haven't tried out this theory yet...
Merry 4th day of Christmas!
Love,
Wednesday, December 22, 2010
My Decked Halls...
We hosted a cocktail party for my hubby's office last weekend and I got a chance to snap some pics right before everyone arrived...
The entry console:
another console around the corner:
closeup of the nativity:
The new mantle all decked out! There's actually a frameless oval mirror up there, but I couldn't get a good shot in this lighting...
A peek into the dining room...
The dining room side of the mantle:
and here's a sneak preview of the changes in the basement family room:
I still have a few projects to finish in here, details coming in the new year!
and I realized the other day that the pic of me at the top of my blog is roughly two years old! Here's a recent shot complete with new(ish) haircut and prego belly!
Merry Christmas!
Love,
Monday, November 22, 2010
Last Minute Turkey Day Craft
Hello, friends! I'm busy putting the finishing touches on my preparations for the big feast tomorrow, and I just wanted to share this fun little craft with you. I'm a total sucker for goofy holiday napkin folds, so my daughter and I made these little guys last year...
We made them at the last minute last year and I think they turned out pretty cute. Just get a pinecone (I couldn't find any nice short fat ones in my yard, so I cut some long narrow ones in half), wrap a pipecleaner around the middle and fold the ends into feet, then glue on a beak and waddle cut out of felt or fabric scraps or construction paper, and googly eyes (I didn't have any googlies on hand so I cut those out of felt too). Then fan fold a napkin behind the pincone for the tail and you've got a cute, festive, kid-friendly addition to your table!
***Oops! I just realized I left out an important part of the instructions- for the face, before gluing on the beak etc., pull off one of the scales, flip it over and glue it onto the front of the pinecone as the face. Then glue on the eyes, beak etc...
Happy Thanksgiving!
Love,
Wednesday, October 13, 2010
My Dad Rocks! (aka 3-sided mantel)
Remember when I went from this:
to this? (Check it out here)
Ever since then I've wanted to have a mantle wrapping all the way around so that I would have one rectangular space above the mantle instead of that difficult upside down L shape wall space to fill.
Enter Dad.
First he removed the trim from the top side of the fireplace surround. Then he screwed strips of wood into the wall just above the tile to support everything. Then he added the little silver brackets to support the mantel shelf. Next the shelf boards were added on top- they are screwed into the wooden strips and the brackets. He even inserted little wooden pegs where the shelf boards meet at the corners to make sure they would stay even. Then he trimmed the face of the shelf boards in a narrow decorative molding.
Then it was time to add the decorative moldings. First he attached baseboard molding upside-down to the underside of the mantle shelf in order to give the crown molding something to attach to. The baseboard molding is screwed in from the top of the mantel shelf.
Next he trimmed it all out in crown molding.
Some action shots:
Can't you just hear him grunting?!
Wanna know something really funny? Whenever my dad works on a project he makes up his own expletives. When I was a kid I thought he was cursing in Italian because he's Italian and that's kinda what it sounds like. But, nope. Turns out it's just his own language. Now everyone in my family jokes that Dad speaks Swahili when he's working.
After spackle, caulk, sanding and two coats of paint, it now looks like this!
and it is super sturdy! I could seriously do chin-ups on it! Okay, someone who can do a chin-up could do chin-ups on it!
Now I just have to figure out what in the world to put up there! (Pay no attention to the vase of pinecones and candlesticks on the dining room side- I was just experimenting...)
Thanks so much, Dad! I absolutely love it! You rock!!
BTW- this dining room side is going to be a little difficult to accessorize because of the indentation above the fireplace. I prefer symmetry, but I may be forced into another arrangement on this side because of the indentation. I may start by trying to force some symmetry by leaning something (wreath, mirror...) against the center line, hopefully masking the indentation, but I'm not sure that will work. Oh, and I'll have to remove my script "F" in order to do that, but I believe it is repositionable and I can think of lots of other places in my house to use it, maybe over the mantel on the living room side in the center. What do you think? Suggestions?
Love,