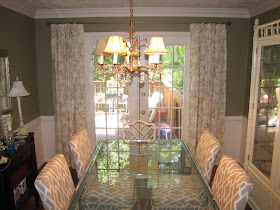
Here's the before:

not a terrible wall color, but I was wanting something lighter and brighter. So, I picked a really pale green, primed and painted two coats and got this:

and I hated it. Ugh. I was really not looking forward to trekking back to Lowe's, picking another color, spending more money on another can of paint, spending another day painting and hoping for the best. Then it occcured to me- I had half a can of green paint that was too dark, and half a can of green paint that was too light. I couldn't use either one so I had nothing to lose. I poured the contents of one can into the other and mixed thoroughly and got this:

and I love it! The color doesn't look quite the same on my monitor as it does in real life, probably because of the flash. I'll try to get better photos when the light improves. For now you'll just have to take my word for it- it's the perfect medium-light gray-green. I actually compared the color to some paint swatches and the resulting color bears a striking resemblance to "Garden Shed" from Martha Stewart's paint line.
Also- if you look behind the chinese chippendale chair (which is due for reupholstering) you can see my faux wainscoting! I'm really excited to tell you about this because I found I a great short cut! I was all set to use Thrifty Decor Chick's instructions. I went to Lowe's and marched myself down the molding aisle, giving myself a pep talk about saws and mitre boxes when I spotted this:

premade molding squares! They're made of lightweight poly so all I had to do was glue them to the wall with all purpose liquid nails, caulk any gaps and paint! They come in different sizes so you can choose the one that works best for your walls. The 18 x 23 size worked great for me. I believe that was the largest size and they were about $12 per panel (the smaller sizes were a few dollars less). I spent just over $100 to do the whole room. I bet buying the molding and doing all the cutting myself would have saved me money, but I am so freaked out about saws, that it was worth it to me to buy these ready made.
I'm pretty happy with the finished product:

BTW- what do you think of my new (to me) rug via CL? It's a 6x9 Restoration hardware basketweave seagrass rug. It still sells for $249 but I got it for $50!
Next up in here:
- reupholster Chinese Chippendale chairs
- Change the backing in the China Cabinet
- Art and accesories!


Love your paint color. The room looks so much brighter and bigger. Your furniture is lovely too. The panel molding you added to the walls is perfect. I really want to do something similar to my dining room. I really do have to get in gear and just do it. Beautiful room. Hugs, Marty
ReplyDeleteLove your room! The paint color turned out fabulously and LOVE the moldings! Great job!!
ReplyDeleteI love the backing of the china cabinet , it is perfect as is , and the chicken wire is awesome, looks great.
ReplyDeleteChris
Just beachy
Pam, your dining room redo looks great! I have a quick question about the china cabinet. (1) Where did you find such a gem? and (2) What did you line the back with? grasscloth, burlap, paint? I can't quite tell from these pics. Anyways, the whole space looks great. And I'm definitely looking at Lowes for the faux moulding squares for another project I'm working on right now. Thanks!
ReplyDeletePam, everything looks amazing! You should be so proud of yourself. :) I love the faux wainscotting, and the wall color looks good too. You're doing a great job!
ReplyDeleteI like the mix of the two paints much better, as well. Sometimes serendipity is with you and the best results come out of the blue.
ReplyDeleteDiane
those framey things are awesome! :) you like my technical terminology there. don't judge! great dining room - love that chinese chair too!
ReplyDeleteLove the paint color - the faux panels are a great find!
ReplyDeleteThat paint color is FAB!! I love that you mixed it! I love those premade boxes -- I haven't used them yet but they are so awesome for anyone without power tools. So easy and the result is fantastic -- this is really, really lovely!
ReplyDeleteDang it! I wish I would have seen this post about the premade molding! I just spent a FORTUNE having it put it by a carpenter!! Nice find!
ReplyDeleteLooks terrific. Who knew you could purchase frames.
ReplyDeleteIt looks great! wonderful job! I didn't even know those already made boxes where an option, could have saved me a lot of time in my last house... good to know!
ReplyDeleteLooks fabulous Pam! I love it! The color is gorgeous and your premade wainscoating rocks! So jealous of your rug buy on CL! I thought I did good on mine from Pier 1 for $120. Lucky you! Looks great!
ReplyDeleteSomehow I missed this post Pam. Your dining room is looking GREAT! I love the paint color you ended up with--it's like Baby Bear's bed. Not too hard, not too soft, but just right! And your molding looks great. I think those pre-made squares sound like a great thing. Good job!
ReplyDeleteHey there! I found your post while I was researching how to do this.I recently became a stay at home mom, and I love to decorate-but money's a little tight. You're (and Lowe's )my hero! Bravo!
ReplyDelete