Monday, June 28, 2010

How To Slipcover Henriksdal Parsons Dining Chairs

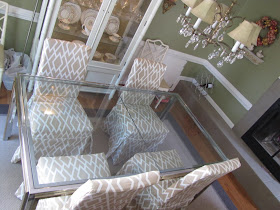
I finished!


The fabric is Duralee "Diamante". I love it!

Please excuse the rest of the room- there are lots more changes in the works...

Before I give you my how-to, if you need some sewing encouragement, read this. I'm not going to reinvent the wheel here, just give some basic instructions. If you need more detailed slipcovering info, read this.

Okay, so I'm not a professional pattern drafter, but here's a sketch of what I did.

And here are close ups so you don't go blind!
A is the back piece, it's just a 17" by 25" rectangle.

B is the seat back. Pay more attention to the measurements than the picture here, it's sort of a trapezoid shape overall- the back side is an inch longer than the front.

C is the seat. Again- go by the measurements, the front side of this piece is 5.5" longer than the back.

D is the skirt. I found that cutting two pieces the entire length of the bolt (54") plus about another 8" piece was the right width to give generous pleats in the corners.

Sorry about the image quality! Email me if you need help deciphering any of that!

The trickiest part about this project was planning out the pattern (I found that kitchen trash bags work well as pattern paper!) but I've already done that part for you! Once I had the pieces cut, it just fit together like a puzzle!
BTW- this pattern is for an ikea "Henriksdal" dining chair, but you could adjust the measurements to fit any parsons style dining chair. Also, be careful because I believe Ikea changed the dimensions of this chair and I'm not sure which version of chair I have since I purchased mine on CL (I got 4 chairs plus two sets of generic slipcovers for $20!) Let me know if you need exact measurements of my chair to compare sizes.


Here's the how-to:
  1. Fold the notched corners of piece B on a diagonal, right sides facing to line up the edges and stitch together the notched corners on piece B
  2. In the same manner, stitch together the notched corners on piece C
  3. Place piece B centered on top of piece C, right sides facing
  4. Stitch piece B to piece C along the U shape at center top of piece C
  5. Lay piece A centered on top of piece B, right sides facing
  6. Stitch together along top edge
  7. Stitch piece A and B together down each side, and continue down the last 4.5" section of piece C.
Now you should have a skirtless slipcover!
  1. Pin the skirt along the bottom edge hiding the seams in the co
    rner pleats. I found it worked best to start pining at the right rear leg.
  2. Stitch the skirt along the bottom edge (you may add piping here- I added ivory store bought piping, one package per chair.)
  3. Hem the skirt- I found putting the chair on top of a table made it much easier to see where to mark the hem.
You're done!


Okay, on to the drapes!!

******UPDATE!!******
An anonymous commenter wrote in and was having some trouble piecing together C&B, so here is a closeup of the side/back of the chair...
Anonymous- I hope this helps! If you're still having trouble please email me directly at pammyfitz@gmail.com since the comment form doesn't allow me to respond directly to your comment.


Love,


Friday, June 25, 2010

Dining Chair Slipcovers...

I'm participating in:


Before:


After:


One down, three to go!

Love,

Tuesday, June 22, 2010

I'm Baaa-aaack!

We just got back from the outer banks on Saturday and we had a great time. In case anyone is looking for nice, reasonably-priced, family-friendly accomodations, we stayed here and loved it!

Now please excuse me while I show off some gratuitous vacation cuteness for the grandparents! There is a little bit of home dec stuff at the end of this post!

We ran...


We napped...


We buried ourselves in the sand...


We searched for shells...


We soaked in the sun (as much as we could through SPF 60!)...


We splashed...


We took it all in...


We conquered the beasts of the sea...


We ran with delight...


We dug...

We filled...


We mixed...


We floated around the lazy river...


We built sand kingdoms...


Did I mention we dug?


We watched seagulls...


We had a blast!

and now we're glad to be home!

I did bring home one little souvenir from an antique shop.


It's a "youth chair". It seats a toddler at just the right height for a dining table. A little more charming than a plastic booster seat. Now I'm on the hunt for another one since my girls currently fight over this one at every meal!

(BTW- anyone else think maybe I wished a little too hard for a vinyl tablecloth that would look okay in my kitchen?!)


In case anyone else is interested, Ikea now sells similar "junior chairs" to match some of their dining chairs.

I thought I'd leave you with a Before shot of my dining room. I figure if I put my plans in writing, I'll have no excuse not to get started!


You can see where I already started painting below the chair rail to the right of the china cabinet. Here's my to-do list:
  • Sew Drapes
  • Sew Slipcovers
  • recover lattice-back chairs
  • Back the china cabinet
  • Paint & Wall treatment
  • Accesories
  • Possibly paint the sideboard
  • Update the Chandelier shades
I'm totally inspired by this room by Victoria Neale for the Greenhouse Showhouse in McLean, VA, shown in the April 2010 issue of Traditional Home. If all goes according to plan, you'll probably notice some similarities...


I better get cracking!


Love,

Monday, June 7, 2010

Greetings from OBX and fabricguru love

Hello friends! Greetings from Kill Devil Hills NC! I'm on vacation with my family for the next two weeks and enjoying every moment! Sorry I left you hanging for so long, I fully intended to do several posts before I left for vacation, but preparing for our trip was more involved than I realized!

I will hopefully be detailing some changes in my dining room when I return, but until then I thought I'd share some pretty fabrics with you!

I recently tried to help my mom's friend track down a high-end fabric she fell in love with for a better price. The high end fabric was Corbin Opal by Carole and was insanely expensive. It is awfully pretty though...


I did some searching on fabricguru.com and came up with some good stand ins for a small fraction of the price. You can click on the photos to see the fabrics on fabricguru.com.

Mill Creek Raymond Waites Evangeline Printed Linen Blend Drapery Fabric in Seaglass


Braemore Amadore Printed Linenweave Drapery Fabric in Linen $7.95 per yard


Braemore Sans Souci Shabby Floral Print Drapery Fabric in Powder $6.95 per yard


Richloom / Better Homes & Gardens Jayda Printed Cotton Drapery Fabric in Bramble $19.95 per yard- the most expensive of the bunch and a bit more contemporary.


Mill Creek Raymond Waites Amorique - Cliffside Drapery Fabric in Cashew


BTW- if anyone knows of any shopping, restaurants, attractions etc... that I shouldn't miss while I'm here, I'm all ears!

Love,